The 'inside edge' of an object means a selection inside the object and close to its real edge. And the 'outside edge' means a selection covering all the pixels of the object and close to its edge. The area between the inside and the outside is the edge of the object and is the semi-transparent part. The program will calculate the real mask from this user-specified inside/outside edge.
The inside/outside edge is not the precise edge of the object so the user doesn't always need to spend too much time doing this precisely. The purpose of selection is to build a trimap to indicate the known foreground, known background and unknown regions.
Polygon selection tool: Click to start selection; right click to remove last point; moving forward and click to continue select; double click or move back to the first point and click to end selection. Press 'shift' or 'Ctrl' for ˇ®add ˇŻor ˇ®subtractˇŻ mode. Mouse wheel to zoom in/out view.
Free selection tool: Drag the left button of the mouse to draw a closed area as a selection. 'Ctrl' and 'Shift' are defined as the polygon selection tool.
Injector tool: Inject single point to foreground or background area.
Stroke tools:A quick way to generate selections for objects with clear edges.
Generate Trimap - Easy way: Create selection by strokes
If the object has a simple and clear edge, you can use 'Stroke based matting' to mask it quickly and easily. There are 3 steps to do this,
1, Use the keep pen in green to stroke inside the object. Use the drop pen in blue to stroke on the outside of the object.
2, The program will generate the inside/outside selection based on the strokes automatically. Check the selections, repeat using keep pen and drop pen to define the selection, until it covers most of the area correctly.
3, Use the unsure pen in red, to make sure the areas between inside and outside cover all semi-transparent areas and hair. Polygon tools are also useful to modify the selections.
Each time you are painting with the keep or drop pen the program will calculate the selection again. So make sure the unsure pen is used only when you no longer need the keep or drop pen. When the trimap is ready, click 'Matting' to start masking the object out. Here is a sample of how to use strokes.
Generate Trimap - Normal Way: Create selection by polygon tools
Using polygon tools to create 2 selections, one is inside the object, another outside it.
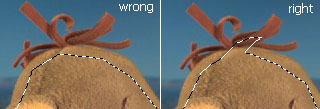
Close to the border or far away?
If the area has a varied colour or changes for the program to distinguish the edge, try to select precisely and close to the border; if the colour is simple and slow changing, you can make a coarse selection.
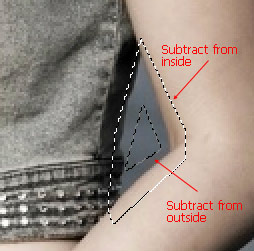
Hoe to deal with a hole?
Using the subtract mode of a selection tool to cut the hole from both inside and outside edge.
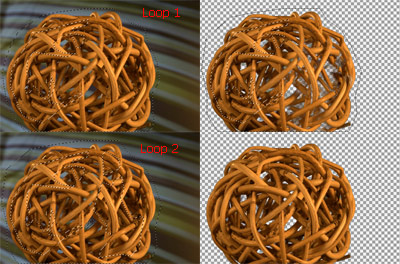
How to matting an object with complex mask?
You can start from the result of a coarse selection first. Check the result, if the foreground or background turns to semi-transparent, using an 'add' or 'subtract' mode of polygon tool to add some sample and matting again (click 'apply') until you get a good result. The 'Inject tool' is also very useful in this case.
What causes defects on result?
Reason 1: If the background and the foreground have similar colour, the program may not able to tell differences and then an error result is generated.
Reason 2: Unknown colour. If a pixel has a colour which does not existed in either the foreground and the background, it could cause a wrong alpha value output.
Classic Algorithm: Running fast with good result on hair and complex shape. May bring more defects. It is the default algorithm for 'auto-preview' of the trimap tools.
Alternative Algorithm: Slower algorithm working brings clearer and neater results. It may lose details for hair or complex areas. It is not the default algorithm which means you need to click the button to apply it.
Copyright 2002-2023,Stepok Image Lab, All rights reserved